Documentation
Learn how each dashboard area works so your team can move faster with confidence
Overview & Tutorial
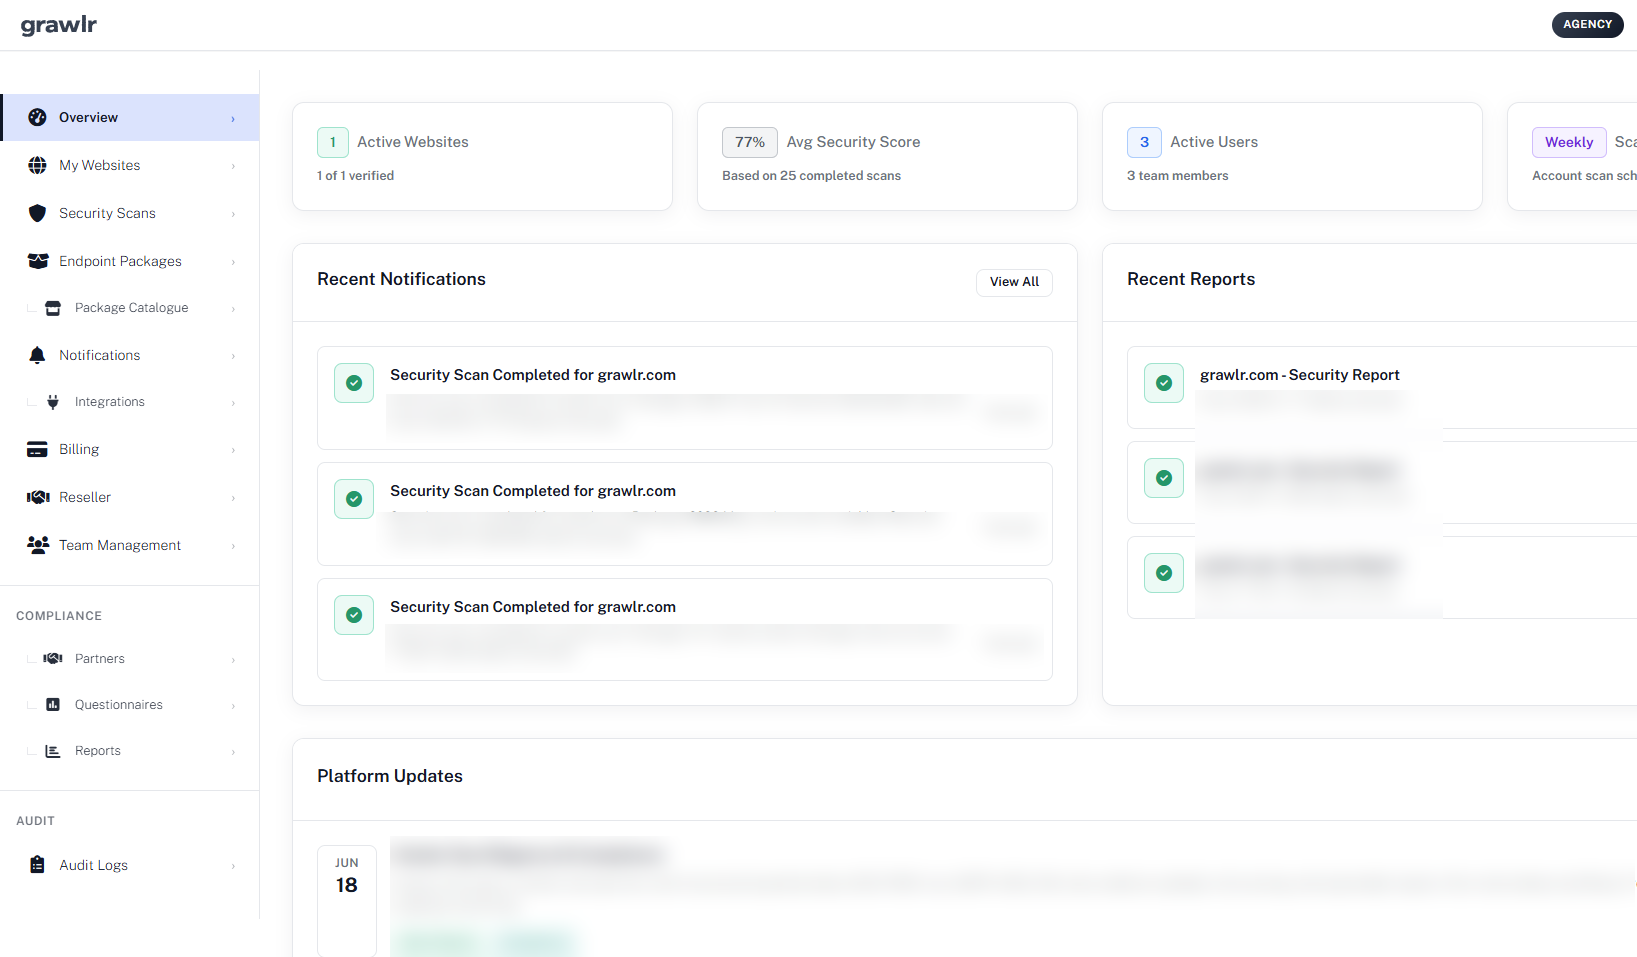
The Overview section is the first page you see after logging in. It gives you a quick status of your account and links to key areas like Websites, Packages, Scans, Reports, Notifications and Compliance.
New users can open the built-in Tutorial, which walks through three core steps: adding your first website, selecting endpoint packages, and reviewing security reports. Each step includes short explanations, concrete examples and direct links into the relevant dashboard views, so you are never left wondering what to do next.
Think of the Overview page as your mission control: it answers what is happening right now, where should I click next, and are there any surprises I should worry about in one place. From here, you can explore at your own pace, follow the tutorial path, or jump into Compliance when you are ready to assess vendors.
Websites - Managing What You Protect
The Websites page is where you add and verify the domains Grawlr will scan. At the top, you see how many sites you use out of your plan limit so you always know your capacity.
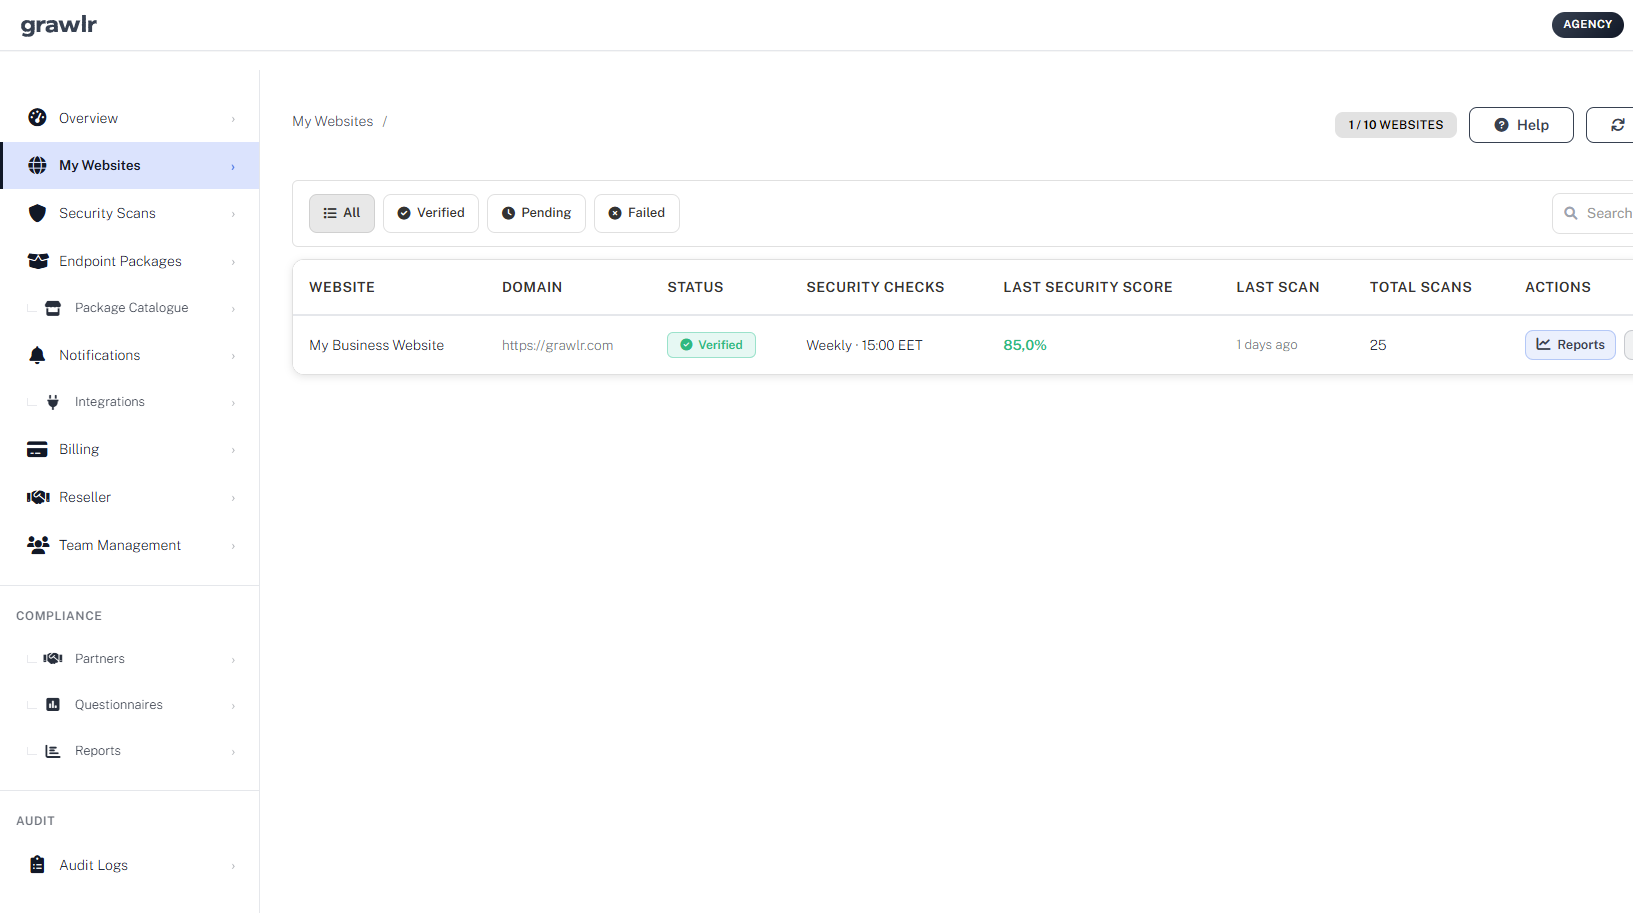
Use Add Website to provide a friendly name, the full URL (including scheme) and a verification method (file upload, DNS TXT record or META tag). After adding a site, the dashboard guides you through verification and offers Verify or Verify All actions to confirm ownership and readiness for scanning.
Each verification method is designed for a different situation:
- File upload - ideal when you have FTP or deployment access to the web root.
- DNS TXT record - perfect when you control DNS but not the application code.
- META tag - useful when you can edit templates or HTML headers.
Once verified, each website card shows verification status, recent scan status and quick actions. This is where you manage your security surface as a portfolio instead of one site at a time.
Endpoint Packages - Choosing What to Test
The Endpoint Packages page controls which attack patterns Grawlr will replay against your websites and APIs. A usage badge shows how many packages you have selected and how many changes you can still make this month, based on your subscription tier.
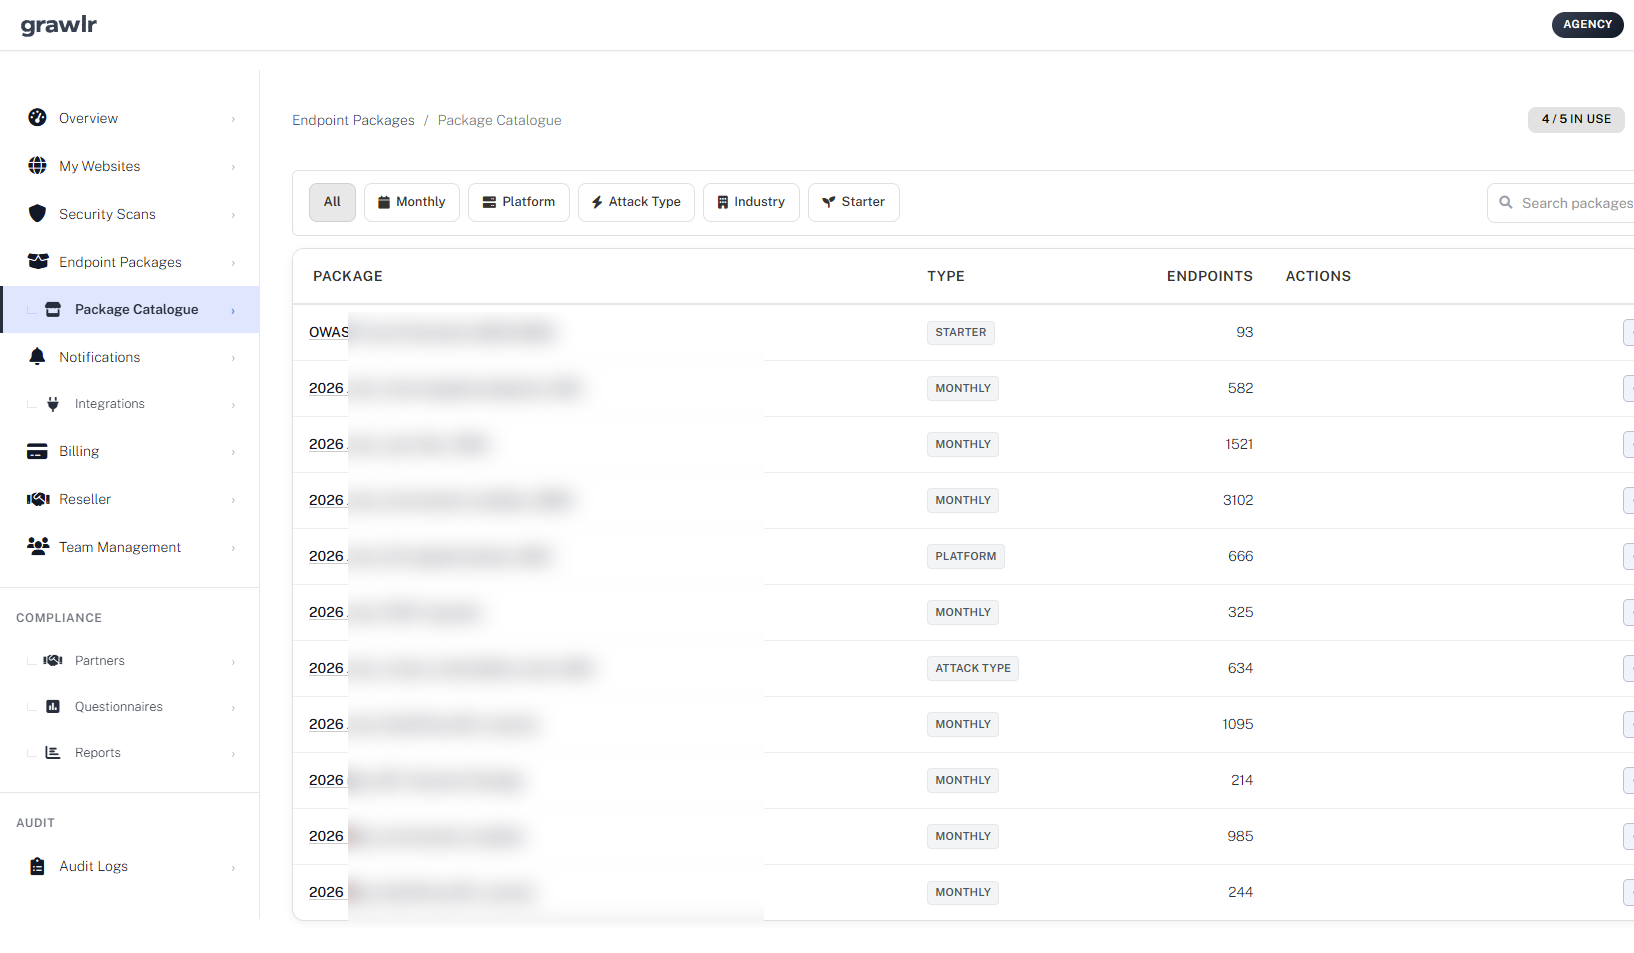
You can review currently selected packages, open Select Packages to change your selection, and filter available packages by type (Monthly, Platform, Attack Type, Industry or Starter). Starter and Monthly packages are ideal as a baseline, while Platform and Attack Type packages let you fine-tune testing for specific stacks and vulnerability classes.
A typical strategy is to:
- Start with a Starter or Monthly package for broad coverage.
- Add Platform packages for technologies you actually use (for example WordPress or Laravel).
- Layer Attack Type packages when you want deeper focus on injections, auth flows or other risks.
Because packages are updated as new attack patterns appear, you get fresh testing behaviour without having to constantly tweak low-level rules yourself.
Partner websites under Compliance do not inherit your account default packages from Packages in use. Assign packages per partner website on the partner detail page, and use Copy packages when the same partner has multiple sites that should share the same coverage.
Security Scans - Running & Filtering Tests
The Security Scans page lists all automated tests that Grawlr runs for your account. You can see which scans are running, which have finished, and which may have failed.
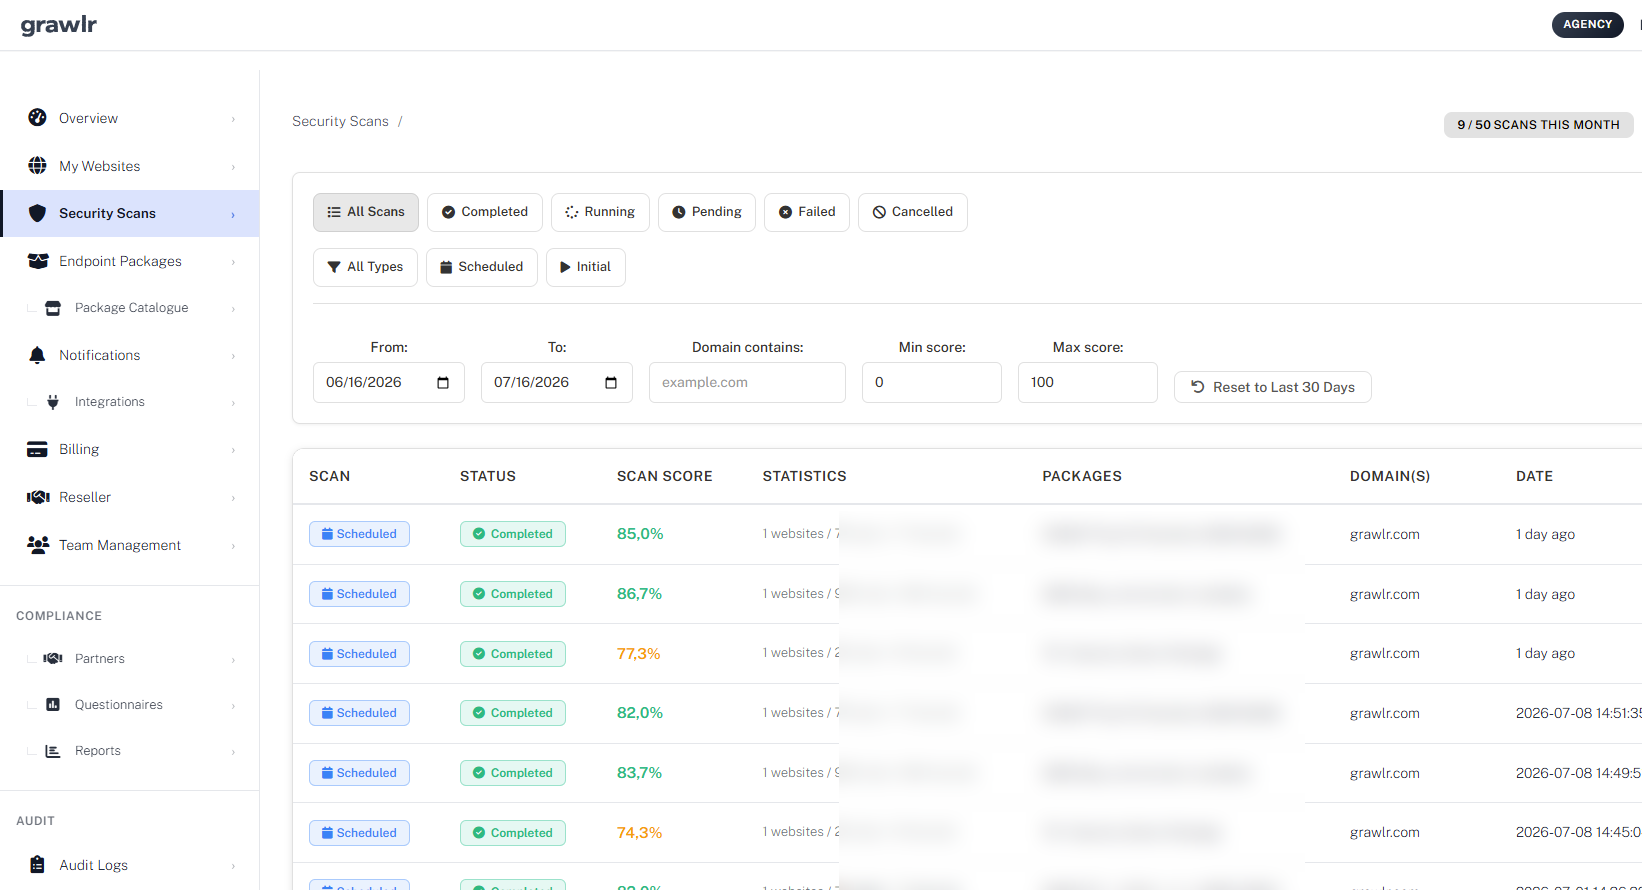
Use the status filters (Completed, Running, Pending, Failed, Cancelled), the scan type filters (Scheduled, Initial) and the date range selector to narrow down what you are looking at. When something fails, you can inspect the error details, fix configuration issues such as an offline website, and rerun. Completed scans link directly to detailed reports in the Reports section where you can dig into findings and remediation steps.
Open a completed scan for baseline security checks (TLS, ports, headers and related signals) and Exposure drift, which compares this scan to the previous one so you can see whether scores, blocked attacks or baseline signals improved or worsened. Partner website scans appear here as well and can be linked into a partner assessment case from Compliance.
The Scans view is where you answer questions like did our scheduled tests actually run, what changed since last week, and are there any failures blocking our security workflow. It works hand-in-hand with Notifications, Reports and Compliance to give you both a timeline and a deep dive into results.
Compliance Partners - Third-Party Risk
Compliance Partners is where you manage the third parties you assess for security and compliance risk. Add a partner with company details, criticality, monitoring status and an optional scan-authorization attestation, then open the partner to link websites, send questionnaires, upload documents and review findings.
Monitoring status controls capacity: Active partners count toward your monitoring slot limit and can receive scheduled scans on linked websites; Prospect partners are for pre-contract questionnaire assessment and do not consume a monitoring slot. Filter by status, criticality, org unit or tag, save reusable views, and export the list as CSV or PDF.
Partner websites are scoped to that partner only. They do not appear on My Websites and do not count toward your website slot limit. Scanning uses your scan authorization on the partner record rather than domain ownership verification. The first enable runs an Initial check (HTTP 200 and HTTPS); scheduled endpoint scans then use packages assigned on that partner website.
On partner detail you can track attack surface scores, upload vault documents (SOC 2, ISO 27001, DPA, insurance and more), record findings and workflow tasks, map third- or fourth-party relationships, and review composite risk over time. Overview also surfaces evidence-backed controls and contradiction flags when questionnaire claims conflict with scan or baseline evidence.
The Manage menu supports tags, org units (subsidiaries), dashboard widgets, CSV import, shared artifacts across org units, and read-only TPRM API keys for external tools.
Questionnaires - Templates, Sends & Review
The Questionnaires hub has three tabs: system Templates from Grawlr, Own copies you forked or created blank, and Sent instances tracked across partners. System templates cannot be edited in place — use Preview, Use template to copy into your library, or Blank PDF for a printable empty form.
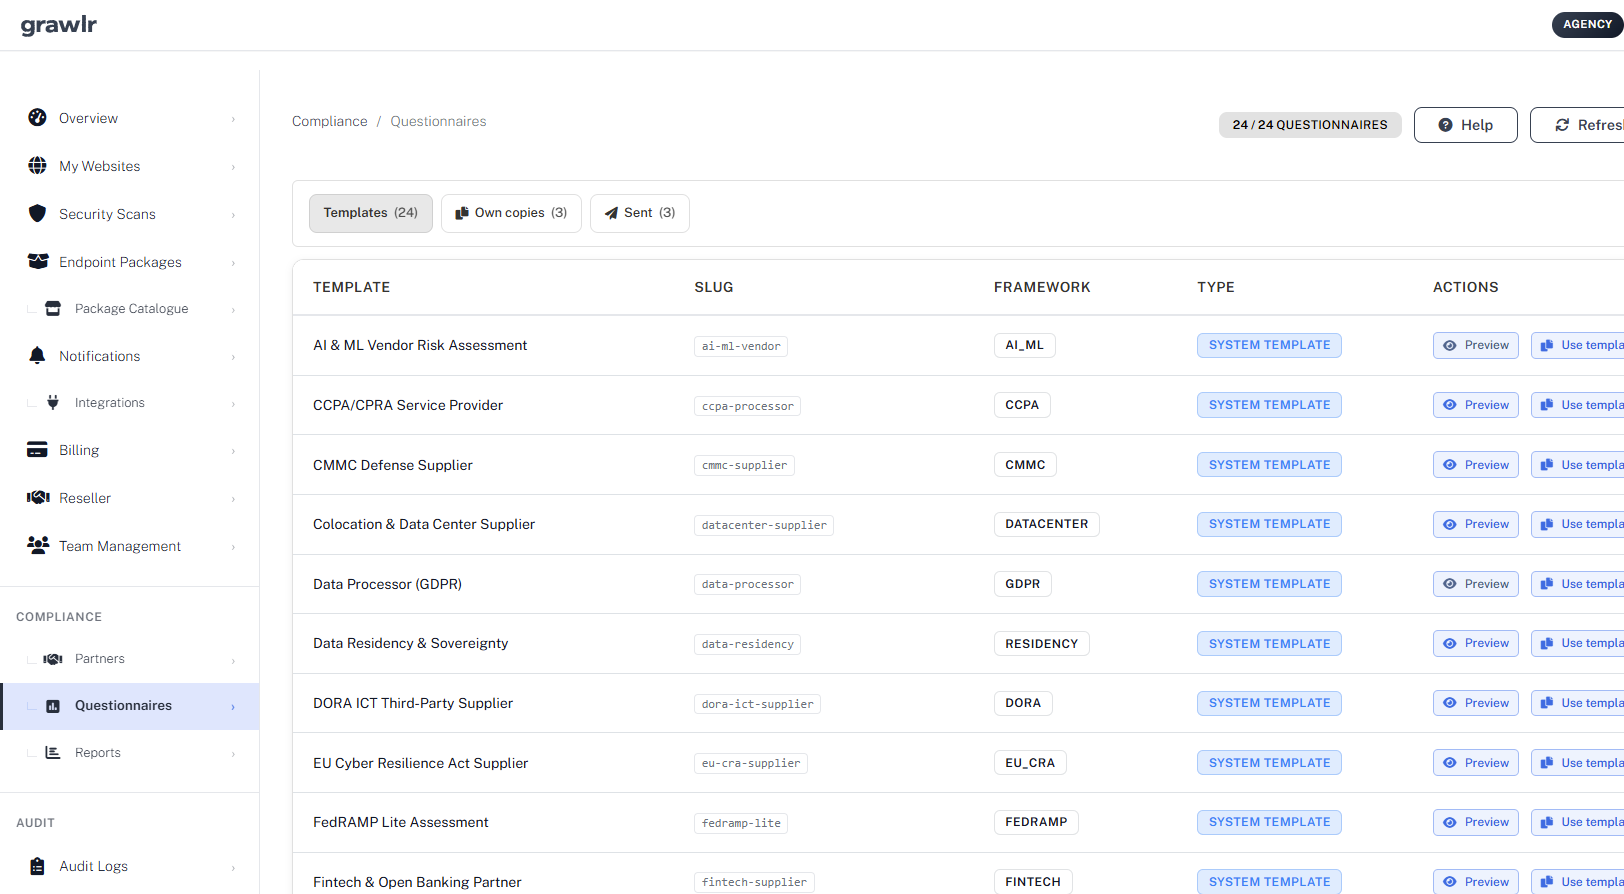
Create blank template or Edit an own copy to build sections and questions (short text, long text, yes/no, single or multiple choice, date, file upload). Save draft while working; Publish version creates an immutable snapshot that can be sent. Questionnaires already in flight keep the version they were sent with.
Send questionnaires from a Partner record (online magic link, blank PDF, or both). Vendors open a public form, save drafts, attach evidence where required, and submit before expiry (default about 30 days). On instance detail you can review responses, approve, request changes or reject, then download or email the completed PDF.
Framework packs include options such as Technical Security Baseline, ISO 27001 Lite, GDPR Data Processor, NIS2, SIG Lite, SOC 2 and other supplier questionnaires. Optional translations help multilingual vendors; Yes/No scoring weights feed the questionnaire part of partner risk scoring.
Compliance Reports - Comparison & Trends
Compliance Reports generate PDF summaries from partner assessment data. Choose a report type, select partners, then Generate PDF. Previously generated reports stay in the saved list for re-download.
Available report types include:
- Scan comparison — side-by-side scan posture for at least two partners.
- Questionnaire comparison — side-by-side questionnaire results for at least two partners.
- Combined posture — scan, questionnaire and partner context together for multiple partners.
- Partner risk trend — how risk metrics change over time for exactly one partner.
Use comparison reports when selecting or reviewing a vendor set, and trend reports when you need a history for a single critical partner. Reporting must be enabled on your account.
Integrations - Chat, Alerting & Workflows
Integrations connect Grawlr events to tools your team already uses, such as Slack, Discord, Mattermost, Rocket.Chat, PagerDuty, Opsgenie, Datadog, Zendesk, Freshdesk and n8n. Your subscription tier limits how many integrations you can enable.
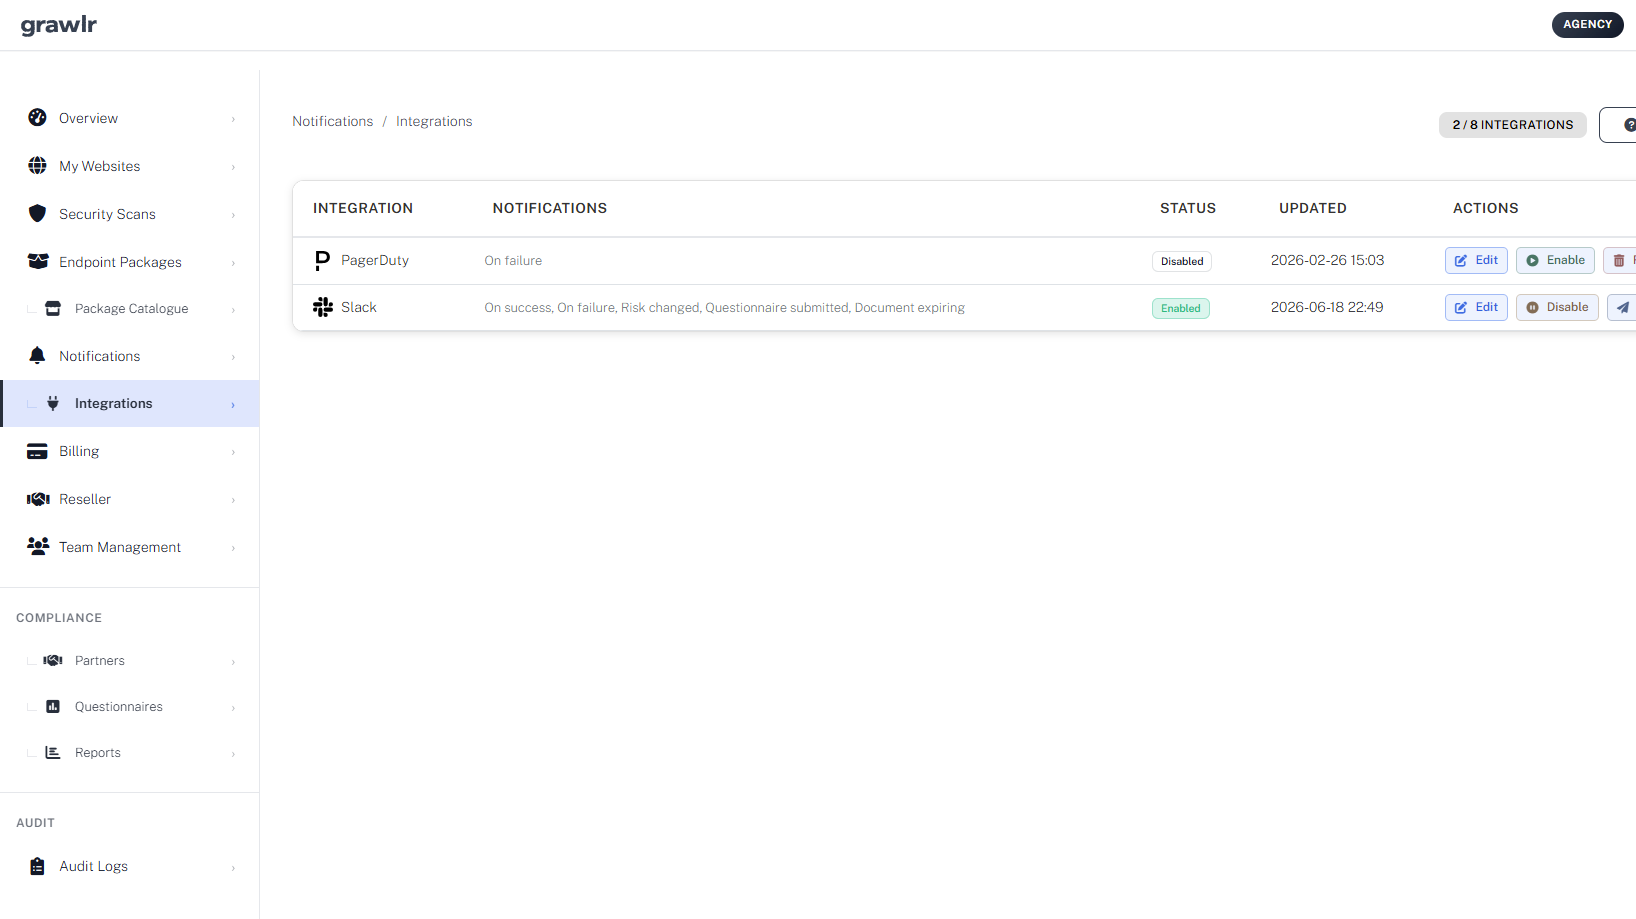
When you add or edit an integration, choose which events to forward: scan events (on start, on success, on failure) and compliance events (risk changed, questionnaire submitted, document expiring). The Notifications column on the Integrations page shows what is active for each connection.
This keeps security and third-party risk signals in the same channels where your team already responds, without duplicating inboxes.
Notifications - Staying on Top of Events
The Notifications page centralises account and security events: new scan results, important security alerts, subscription changes and other key activity across your workspace.
You can see unread and total counts at a glance, filter by all, unread, read or urgent, mark all messages as read with a single action, and open linked scan reports directly from relevant notifications. Treat this as your activity inbox - if something important happens, you will see it here first.
Typical notification types include:
- Scan completed with new findings.
- Scan failed due to connectivity or configuration issues.
- Subscription or billing-related changes that may affect limits.
- Important platform updates that could impact your security posture.
Instead of scrolling through logs or email threads, you can use Notifications as a single, in-product feed of what matters most right now.
Audit Logs - Full Accountability
Audit Logs record who did what in your account and when, which is essential for compliance, troubleshooting and internal security reviews. Every meaningful action in the dashboard is captured with a timestamp and actor.
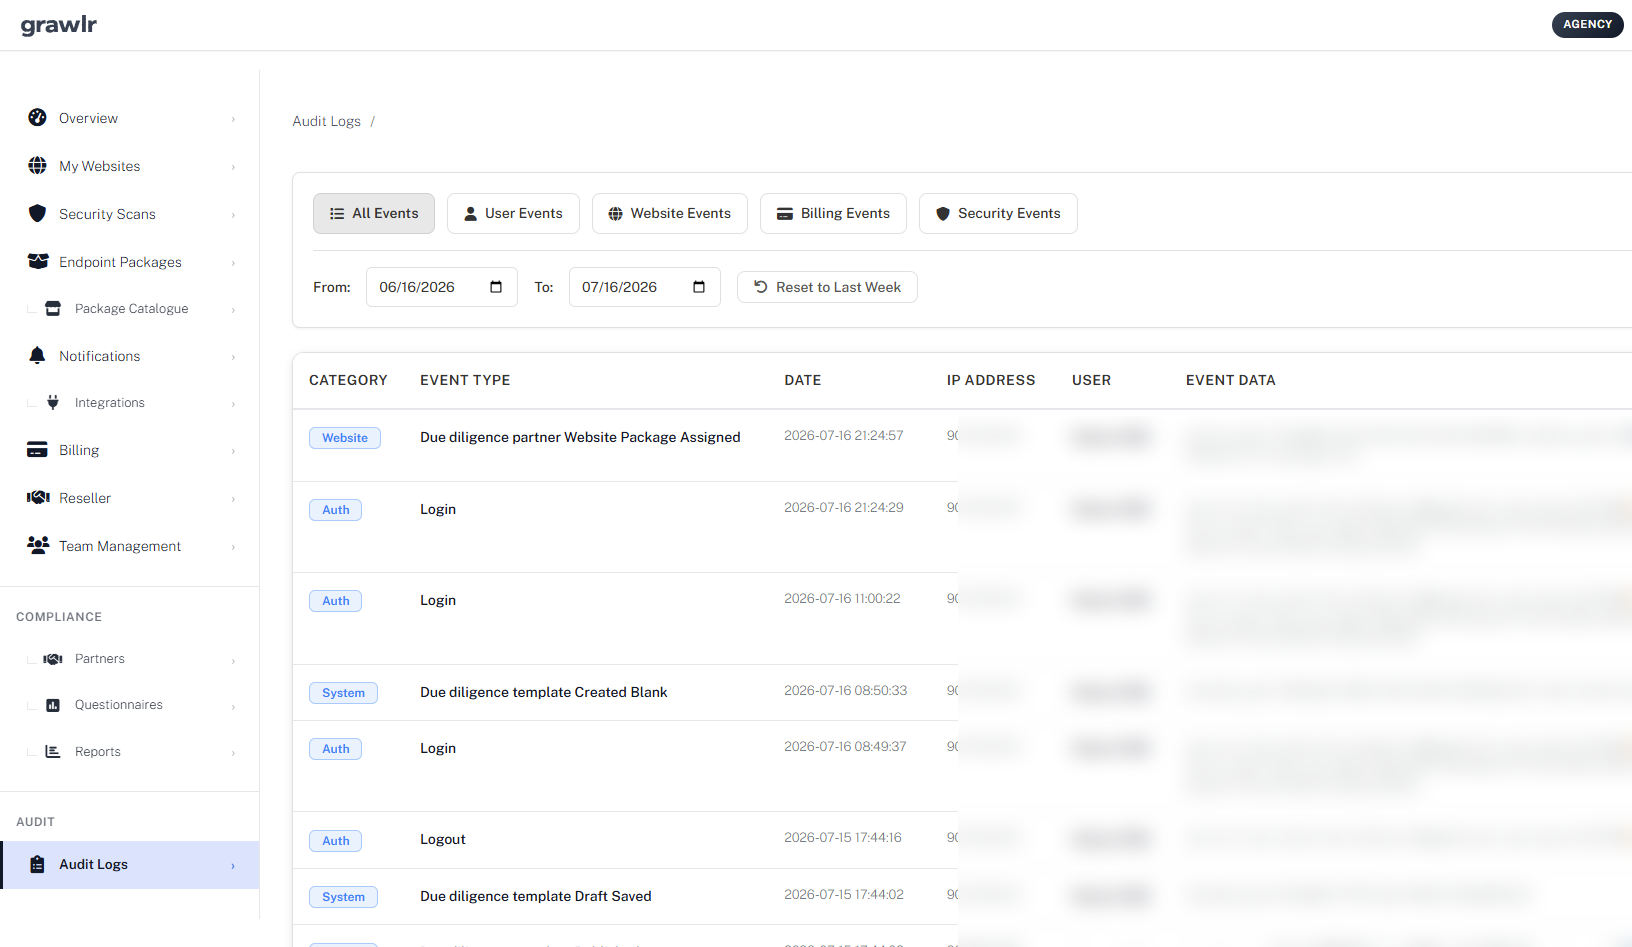
Filters allow you to focus on user events, website events, billing events or security events. A date selector lets you inspect a particular period, and depending on your plan you may also have options to export logs into external compliance or monitoring tools.
Common use cases include reconstructing who changed a website configuration before an incident, proving to auditors that only authorised users performed sensitive actions, or correlating Grawlr events with other logs in your SIEM. Audit Logs turn we think this happened into we can show exactly what happened and when.
Team Management - Working with Others
The Team page is where you invite colleagues and control who has access to which parts of your Grawlr workspace. It is designed so that non-technical stakeholders can safely view reports while a smaller core team manages scans, websites, billing and compliance.
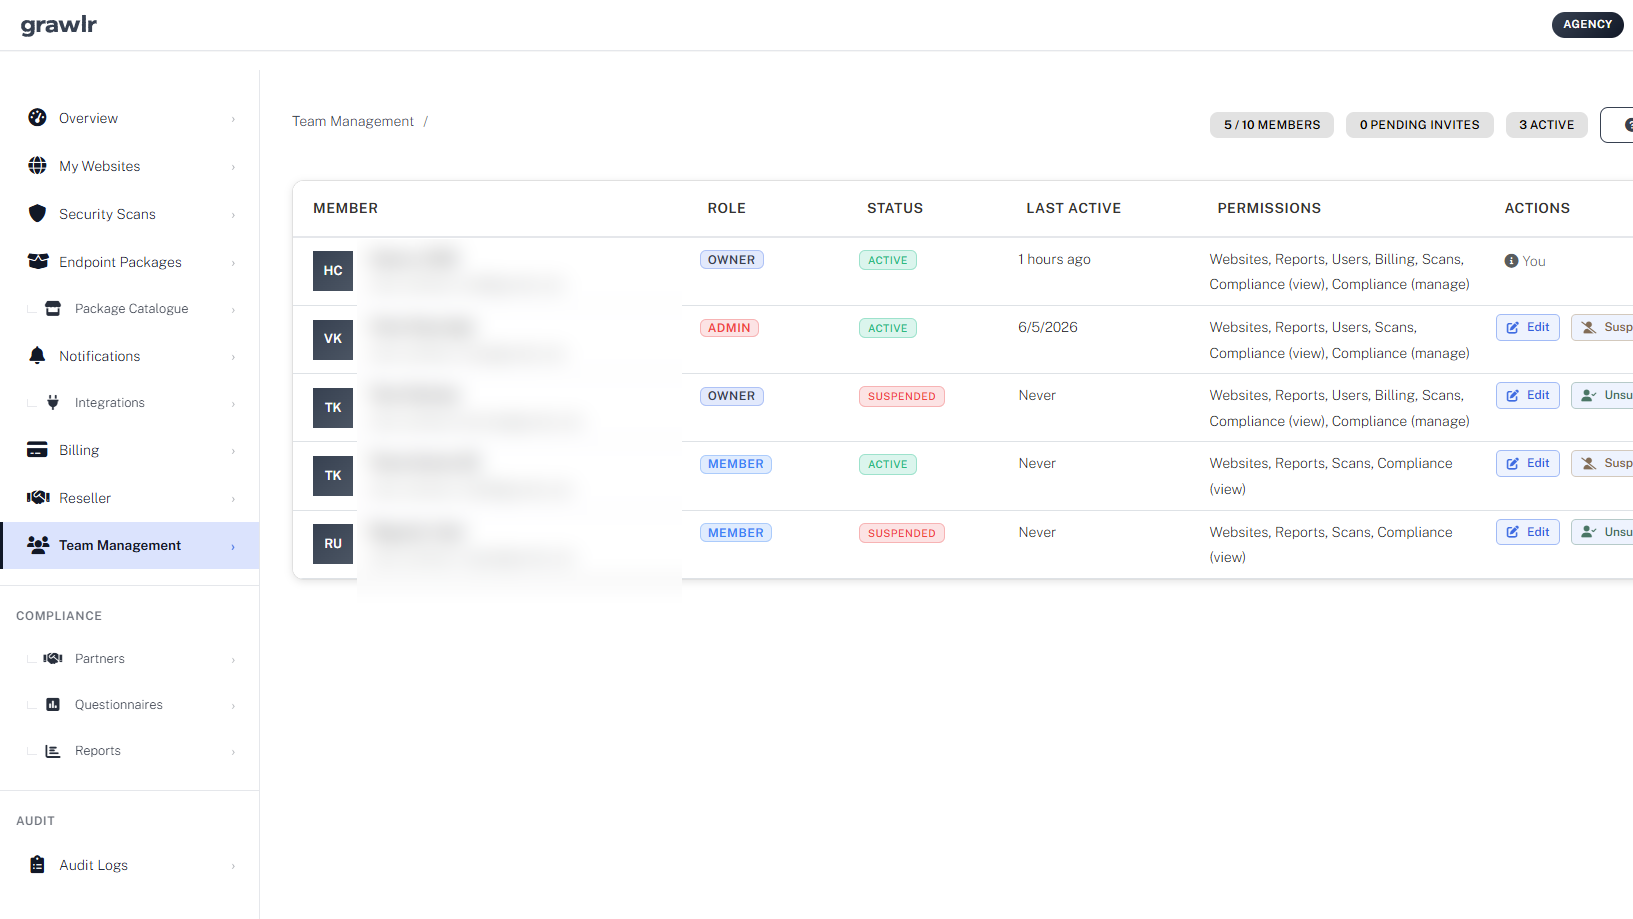
From here you can invite new members by email and assign roles (Owner, Admin, Member, Viewer), see pending invitations and resend or cancel them, edit existing members roles and basic details, and suspend accounts without losing their history. This helps you align access with how your organisation actually works.
A typical pattern is to keep one or two Owners, a few Admins who manage day-to-day security operations, several Members who work with reports and website configuration, and Viewers for leadership or stakeholders who only need read-only insight. Clear roles reduce mistakes and make security responsibilities visible.
When Compliance is enabled, you can also override View compliance and Manage compliance on invites and member edits. View lets people see partners and questionnaires; Manage allows sending questionnaires and changing partner data. Manage seats are limited by plan; view access is not.